
The Sunflower Granny Square – Crochet Tutorial is one of the most beloved projects for crochet lovers around the world. This pattern combines the timeless beauty of the granny square with the vibrant charm of a sunflower, making it a perfect choice for blankets, pillows, bags, and even clothing. Whether you are a beginner eager to learn new stitches or an experienced crocheter looking for inspiration, this project offers endless possibilities.
The popularity of the sunflower granny square comes from its cheerful design and versatility. Sunflowers symbolize warmth, happiness, and positivity, and when translated into crochet form, they bring life and color to any handmade creation. Following a detailed tutorial ensures that every crocheter, regardless of skill level, can create a beautiful piece that captures the essence of summer and nature.
In this article, we will go step by step through the process, share tips on materials, explore creative uses, and answer the most common questions about the Sunflower Granny Square – Crochet Tutorial. By the end, you will feel confident enough to start your own sunflower project and maybe even adapt it to match your personal style.
Choosing the Right Materials for a Sunflower Granny Square – Crochet Tutorial
The first step to creating a stunning sunflower granny square is selecting the proper yarn and hook. For best results, choose high-quality cotton or acrylic yarn. Cotton yarn provides durability and crisp stitch definition, while acrylic yarn offers softness and warmth. Both work beautifully, so the decision depends on your personal preference and the purpose of your project.
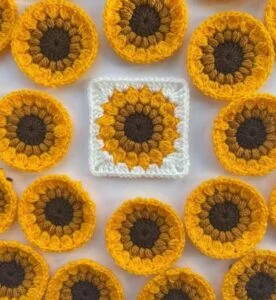
When it comes to colors, yellow and brown are classic choices for the sunflower’s center and petals, while green or neutral tones make the perfect background. However, don’t be afraid to experiment with non-traditional shades. A sunflower with pastel petals or a bold background color can give your work a modern and unique twist.
The crochet hook size also matters. A smaller hook will create tighter, more defined stitches, while a larger hook gives your square a softer, looser look. Most Sunflower Granny Square – Crochet Tutorials recommend using a 4 mm to 5 mm hook, but always check the yarn label for the recommended size.
Besides yarn and hook, having the right tools makes the process smoother. Scissors, stitch markers, and a yarn needle for weaving in ends are essential. Investing in ergonomic crochet hooks can also help reduce hand strain during long sessions, allowing you to enjoy your crafting time without discomfort.
Another aspect to consider is the gauge. While gauge is not always critical for granny squares, maintaining a consistent stitch size ensures that all your squares match in dimension when assembling a larger project like a blanket. Consistency is key when combining multiple squares.
Finally, prepare your workspace. A well-lit, comfortable environment makes a huge difference in your crafting experience. Keep all your materials close by, so you can focus entirely on following the Sunflower Granny Square – Crochet Tutorial without interruptions.
Step-by-Step Process of Making a Sunflower Granny Square – Crochet Tutorial
Once your materials are ready, it’s time to dive into the actual making of the square. Most tutorials begin with creating the center of the sunflower, usually made in brown or dark yellow. This part forms the foundation, so focus on making it tight and neat. The magic ring method is often recommended for this step, as it allows you to close the center firmly without leaving gaps.
The next stage is forming the sunflower petals. These are typically worked in bright yellow yarn, using stitches such as double crochets or trebles. The trick to achieving a full, realistic look is to crochet multiple stitches into the same space, giving the petals volume and shape. This part of the Sunflower Granny Square – Crochet Tutorial is where your square really begins to resemble the flower.
After the petals, the background color is added to transform the flower into a square shape. Usually, this involves clusters of double crochet stitches worked around the petals. The goal is to create a balanced frame so the sunflower sits perfectly centered. It may take a few rounds to square off the circle, but once completed, you’ll see a beautiful, polished design.
Joining squares is an exciting step if you plan to create a larger project. There are many methods, including whip stitch, slip stitch, or the join-as-you-go technique. Choose the method that suits your style and the type of finish you want. A seamless join can make the sunflowers appear as though they are blooming together across your blanket.
Blocking is another important part of the process. Even the most careful crocheters may end up with slightly uneven squares. Lightly wetting and pinning your sunflower granny square to a flat surface helps it retain its shape and ensures that all your squares look uniform when assembled.
As you gain confidence, you can adjust the stitch count, petal size, or even add decorative borders. The beauty of this Sunflower Granny Square – Crochet Tutorial is its adaptability, letting you create variations that reflect your personal creativity.
Creative Ways to Use the Sunflower Granny Square – Crochet Tutorial
One of the main reasons the Sunflower Granny Square has become so popular is its versatility. These squares can be used in a wide variety of projects, making them perfect for both personal use and handmade gifts.
A blanket made entirely of sunflower granny squares is a stunning statement piece. Whether draped over a couch or spread across a bed, it brings warmth and cheer into any room. You can choose a uniform design or mix different color combinations to create a patchwork-style effect.
Cushion covers are another creative option. A single sunflower granny square on the front of a pillowcase instantly adds charm and personality to your home décor. Pair it with neutral fabrics for a minimalist touch or use bold colors for a vibrant look.
If you enjoy wearable crochet, sunflower granny squares can be transformed into stylish tops, cardigans, or bags. Simply join the squares in creative layouts, and you’ll have a handmade item that stands out from store-bought fashion. Accessories like tote bags or even scarves also become eye-catching with sunflower motifs.
Smaller projects such as coasters, pot holders, or wall hangings are perfect for beginners who want to practice without committing to a large project. These mini versions are quick to make and also serve as thoughtful handmade gifts for friends and family.
Another exciting use is in seasonal décor. Since sunflowers are often associated with late summer and autumn, incorporating sunflower granny squares into table runners or decorative throws can bring seasonal warmth to your home.
Lastly, these squares can be combined with other crochet motifs. Mixing sunflowers with traditional granny squares or floral designs can result in truly unique projects. This opens up endless opportunities for experimentation and creativity.
Tips for Success with a Sunflower Granny Square – Crochet Tutorial
To make the most of your Sunflower Granny Square – Crochet Tutorial, it helps to follow some tried-and-true tips from experienced crocheters. These small details can make a big difference in the final look of your work.
First, always keep your tension consistent. Uneven tension can cause your squares to warp, making it difficult to join them later. If you notice your stitches are too tight, try loosening your grip on the yarn. If they are too loose, use a slightly smaller hook.
Second, count your stitches carefully. Granny squares rely on symmetry, and even a small mistake can throw off the pattern. Using stitch markers in the corners can help you stay on track. Double-checking your work at the end of each round prevents bigger problems later.
Third, weave in your ends neatly as you go. Many beginners leave this task until the very end, but dealing with dozens of loose yarn tails can become overwhelming. Finishing them as you complete each square keeps your project tidy and reduces frustration.
Another useful tip is to practice color changes. Switching yarns smoothly without leaving gaps ensures that your sunflower petals and background look polished. Techniques like the invisible join can create a professional finish.
Blocking your squares, as mentioned earlier, is not optional if you want perfect results. Even if your stitches are consistent, blocking helps relax the yarn fibers and gives each square a clean, finished shape.
Finally, be patient with yourself. Crochet is as much about the process as it is about the final result. Enjoy the journey of creating each sunflower granny square, and don’t be afraid to make mistakes. Every project teaches you something new.
About Sunflower Granny Square – Crochet Tutorial
1. Is the Sunflower Granny Square suitable for beginners?
Yes, many tutorials are beginner-friendly. As long as you are comfortable with basic stitches like chains, double crochets, and slip stitches, you can follow along successfully.
2. How long does it take to make one sunflower granny square?
On average, it takes 30 to 60 minutes to complete a single square, depending on your skill level and speed. With practice, you’ll become faster.
3. What yarn is best for sunflower granny squares?
Cotton yarn is recommended for crisp stitches, while acrylic yarn works well for softer and warmer projects. Both options are suitable depending on your preference.
4. Can I make sunflower granny squares in different colors?
Absolutely! While yellow and brown are traditional, you can experiment with any color palette you like. Pastels, brights, or even monochrome designs can all look beautiful.
5. Do I need to block every sunflower granny square?
Blocking is highly recommended, especially if you are joining multiple squares. It ensures that all your pieces are uniform and fit together neatly.
6. How do I join sunflower granny squares together?
There are several methods, such as whip stitch, slip stitch, or join-as-you-go. The method you choose depends on your desired finish and project style.
7. Can I sell items made with sunflower granny squares?
Yes, handmade items created with this design can be sold. Just make sure you are not reselling someone else’s written pattern, but rather selling your finished crochet projects.
The Sunflower Granny Square – Crochet Tutorial is a delightful project that combines creativity, tradition, and the joy of handmade crafts. From choosing the right yarn to mastering stitches and exploring creative uses, this tutorial empowers you to bring sunshine into your crochet projects.
Whether you make a blanket, pillow, or wearable accessory, each sunflower granny square carries a touch of warmth and charm. We hope this guide has given you the confidence to start your own project.
Now we’d love to hear from you! What do you think about the Sunflower Granny Square – Crochet Tutorial? Share your honest opinions and suggestions so we can continue creating helpful and inspiring content for fellow crochet enthusiasts.