
Knit Headband Anyone Can Make is more than just a fun weekend craft — it’s a stylish, functional accessory that even complete beginners can create. Whether you’re looking for a cozy piece to keep your ears warm in winter or a light and decorative accessory for summer, a knit headband can be adapted to any style, season, and skill level. The best part? You don’t need advanced knitting experience, expensive tools, or a lot of time to make one.
Crafting your own headband is not just about creating something beautiful — it’s also about the satisfaction of making it yourself. In a world filled with mass-produced accessories, the charm of a handmade item stands out. When you make a knit headband anyone can make, you can choose your yarn, color, and pattern to reflect your personal taste. This makes each headband truly one of a kind, and it’s a fantastic way to express your creativity.
Plus, knitting has been proven to be a relaxing and even therapeutic activity. The repetitive motions of knitting can help reduce stress, improve focus, and give you a sense of accomplishment. By following a few simple steps, you’ll have a beautiful knit headband ready to wear or give as a thoughtful, handmade gift. Let’s explore how to make one, along with tips for customization, yarn choices, and styling ideas.
Why a Knit Headband is the Perfect Beginner Project
Starting your knitting journey can feel overwhelming with so many patterns, stitches, and tools out there. That’s why a knit headband anyone can make is the ideal first project. It’s small, manageable, and allows you to practice the basics without committing to something too complicated.
First, a headband doesn’t require a lot of yarn. You can use leftover yarn from other projects, which makes it budget-friendly. You also won’t need advanced techniques — simple knit and purl stitches are enough to create a beautiful design. For beginners, this is a great way to gain confidence and improve consistency in your stitches.
Second, the project is portable. You can work on it during lunch breaks, while traveling, or in the evening while watching TV. Since it’s small, it won’t take weeks to complete — many people finish a knit headband in just one or two sessions. This quick turnaround makes it a satisfying project that gives you an instant reward for your effort.
Third, it’s easy to fix mistakes. Unlike large projects like sweaters or blankets, you won’t feel discouraged if you make a small error. You can simply unravel a few rows and redo them without losing much time. This forgiving nature of the project helps you learn without pressure.
Fourth, a knit headband teaches you skills you can use in bigger projects. From casting on and binding off to tension control and basic shaping, these techniques will carry over to scarves, hats, and more advanced knitting patterns.
Finally, it’s fun to customize. You can experiment with different stitch patterns, add buttons, bows, or even incorporate a twist in the center for a chic look. The possibilities are endless, and you can truly make each headband reflect your personality.
Choosing the Right Materials
The success of your knit headband anyone can make depends a lot on the materials you choose. Selecting the right yarn, needles, and additional tools will make the process easier and ensure your headband looks great and feels comfortable.
Start with yarn selection. For beginners, medium-weight yarn (often labeled as worsted weight) is ideal. It’s thick enough to work with easily and shows stitches clearly, helping you see your progress. Wool and acrylic blends are a good choice — they’re soft, durable, and come in a variety of colors.
If you want a headband for cold weather, choose a warm, insulating yarn like merino wool or alpaca. For summer, a lighter cotton yarn will keep the accessory breathable and comfortable. Remember, the texture of your yarn can dramatically affect the final look and feel. Smooth yarns will give a sleek finish, while textured or fluffy yarns add a cozy, rustic charm.
Next, choose your knitting needles. The size should match the recommendation on your yarn’s label, usually around US size 7-9 for worsted weight. Circular needles can be helpful if you plan to knit in the round, but straight needles are perfectly fine for a flat headband that you sew together later.
Other helpful tools include scissors, a tapestry needle for weaving in ends, and stitch markers if you’re working with more complex patterns. These are small investments that will make your knitting experience smoother and more enjoyable.
Don’t forget to consider color and pattern. A solid color will show off your stitch work, while variegated yarn creates natural color patterns without extra effort. If you’re making multiple headbands, experiment with both for variety.
Finally, always check your gauge before starting. This ensures your headband will fit properly and not be too loose or too tight. Even a beginner project benefits from this simple preparation step.
Step-by-Step Guide to Making a Knit Headband
Creating a knit headband anyone can make can be broken down into a few simple steps. With a bit of patience and attention, you’ll have your headband ready in no time.
Start by casting on the required number of stitches. This will depend on the width you want for your headband. For a standard adult size, 12–18 stitches in worsted weight yarn is common. Beginners can use the long-tail cast-on method, which is simple and creates a neat edge.
Next, choose your stitch pattern. The garter stitch (knitting every row) is the easiest and creates a stretchy, textured fabric. If you’re feeling adventurous, try a rib stitch by alternating knit and purl stitches — this makes the headband extra elastic and snug.
Work in your chosen stitch until the headband reaches the length needed to fit around your head. This is typically 18–20 inches for adults. Always measure before binding off to ensure a perfect fit.
Bind off your stitches using a method that matches your cast-on edge. This will give your headband a balanced look and prevent curling. Once you’ve bound off, leave a long tail of yarn for sewing.
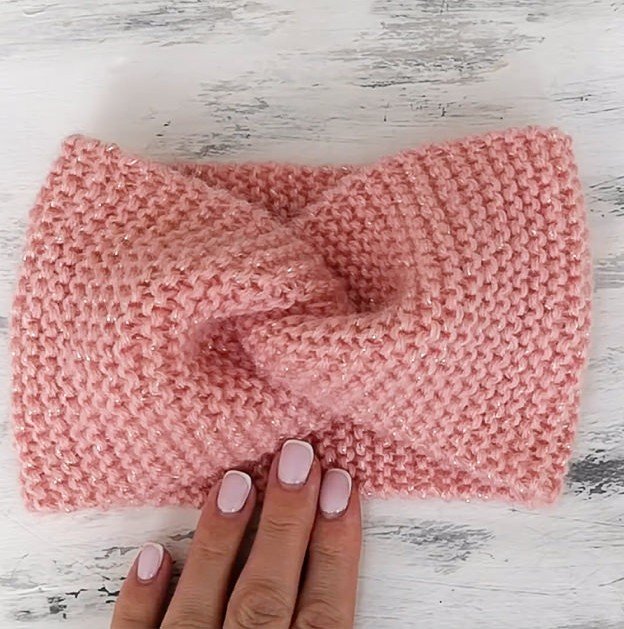
Sew the ends together using your tapestry needle. You can make a simple seam for a classic look or twist one end before sewing to create a stylish turban-style headband.
Finally, weave in all loose ends, and your headband is ready to wear. You can block it by gently washing and shaping it, which helps even out stitches and gives the headband a polished appearance.
Creative Ways to Style Your Knit Headband
Once you’ve made a knit headband anyone can make, the fun part is styling it. A handmade accessory can elevate any outfit and add a personal touch to your look.
Wear it in cold weather to keep your ears warm while still looking stylish. Pair it with a cozy sweater, jeans, and boots for a chic winter outfit.
For a boho summer look, choose a lightweight yarn and wear your headband with a flowy dress or a casual tank top and shorts. Cotton yarn headbands in bright colors can give you that perfect festival vibe.
You can also use your knit headband as a workout accessory. A snug, ribbed headband will keep your hair back and absorb sweat during light exercise or yoga sessions.
If you like accessorizing, add decorative elements to your headband. Buttons, beads, or small crocheted flowers can make it unique. Matching the embellishments to your outfit can turn your headband into a statement piece.
For gifting, package your handmade headband in a small box with tissue paper and a handwritten note. This makes a thoughtful present for birthdays, holidays, or just to show someone you care.
Finally, don’t be afraid to make multiple headbands in different styles. Having a variety means you can match them to different seasons, moods, and occasions.
Knit Headband Anyone Can Make
Q: Can a beginner really make a knit headband easily?
A: Yes, even absolute beginners can make one with basic knit and purl stitches. It’s a simple, forgiving project that helps you build knitting skills.
Q: How long does it take to make a knit headband?
A: Most people can complete one in 2–4 hours, depending on their knitting speed and chosen pattern.
Q: What yarn is best for a knit headband?
A: Medium-weight yarn like worsted weight is ideal. Wool blends work well for winter, while cotton is great for warmer months.
Q: Do I need special needles for a headband?
A: No, regular straight needles work fine. Circular needles are an option if you prefer knitting in the round.
Q: How do I make sure my headband fits?
A: Measure your head before starting and check your knitting gauge. Adjust the length accordingly for a snug but comfortable fit.
Q: Can I wash my knit headband?
A: Yes, but follow the care instructions for your yarn. Most hand-knit items do best with gentle hand washing and air drying.
Making a knit headband anyone can make is the perfect way to start or expand your knitting journey. It’s easy, customizable, and a practical accessory you’ll enjoy wearing or gifting. From choosing the right yarn to adding personal touches, this project offers endless creative possibilities while staying beginner-friendly.
If you’ve followed the steps in this guide, you now have the knowledge to create your own unique knit headband. I’d love to hear your honest opinion and suggestions — share your experience, tips, or creative variations so others can be inspired too.