
If you’ve ever wanted to try quilting but didn’t know where to start, this Quilt As You Go Mug Rug Tutorial (with applique) is the perfect beginner-friendly project. It’s small enough to finish in a single afternoon but still teaches valuable quilting techniques you can apply to larger creations. Whether you’re looking for a way to use up fabric scraps, practice your sewing skills, or simply make a functional piece of home décor, a mug rug is a fantastic choice.
This project combines the quilt-as-you-go method with a fun applique accent, giving you the opportunity to learn two quilting techniques in one go. The quilt-as-you-go technique allows you to piece and quilt at the same time, which saves effort and creates a neat, layered look. Adding applique on top gives your mug rug a personalized touch—whether it’s a heart, a flower, or any seasonal motif that suits your style.
In this step-by-step Quilt As You Go Mug Rug Tutorial (with applique), you’ll discover how to prepare your materials, assemble the layers, add applique, and finish your project so it’s durable and beautiful. By the end, you’ll not only have a charming handmade mug rug but also the confidence to tackle more advanced quilting projects in the future.
Understanding the Quilt-As-You-Go Method
The quilt-as-you-go technique is exactly what its name suggests: you sew and quilt your layers as you assemble them. This saves you the extra step of piecing the top, creating the quilt sandwich, and quilting it afterward. For small projects like a mug rug, it’s especially convenient and helps you achieve crisp, aligned seams without much hassle.
One of the biggest advantages of this method is that you can work in manageable sections. Instead of wrestling with a large quilt under your sewing machine, you handle smaller fabric pieces that are easy to maneuver. This makes it ideal for beginners or anyone working on a standard home sewing machine.
A Quilt As You Go Mug Rug Tutorial (with applique) also lets you see instant results. Each time you sew a strip or fabric piece, it’s already quilted down, and you can watch your mug rug come together in real time. This instant gratification keeps you motivated to keep sewing.
Another perk is the creative freedom it allows. You can mix and match fabrics, play with patterns, and experiment with colors without worrying about the complexity of large-scale quilting. Plus, the small size of a mug rug encourages you to try bolder design choices.
In this method, your layers typically include a backing fabric, batting in the middle, and the top fabric pieces sewn directly onto the batting. This layering creates both structure and softness. The stitching lines that secure each new fabric piece also serve as your quilting lines.
Because the quilting is done as you go, there’s no need to mark intricate quilting designs beforehand. Your seams become part of the final texture, giving your mug rug a professional, finished look with minimal extra effort.
Choosing Fabrics and Materials for Your Mug Rug
Selecting the right materials is key to making your Quilt As You Go Mug Rug Tutorial (with applique) project successful. Since a mug rug is a small item, it’s a great opportunity to use up leftover fabric scraps from other sewing projects.
For the backing fabric, choose something sturdy but still attractive—cotton quilting fabric works perfectly. This layer will be visible when you flip the mug rug over, so pick a print or color that complements the top.
The batting layer in the middle provides softness and absorbency, which is important for catching spills or condensation from mugs. A low-loft cotton batting works best because it lays flat and doesn’t add too much bulk.
For the top fabric strips or pieces, you can be as creative as you want. Solid colors, florals, polka dots, or seasonal prints all work beautifully. The quilt-as-you-go method makes it easy to blend different patterns together.
When adding applique, choose a contrasting fabric so the design stands out against the pieced background. You can use fusible webbing to secure your applique shape before stitching it down for extra precision.
Don’t forget matching or coordinating thread. Since your stitching will be visible, thread color plays a role in the overall look. You might choose a neutral shade for subtlety or a bold color to add extra personality.
Step-by-Step: Assembling Your Quilt-As-You-Go Mug Rug
To start your Quilt As You Go Mug Rug Tutorial (with applique), cut your backing fabric and batting to the same size—slightly larger than your desired finished size to allow for trimming. Place the backing fabric right side down and center the batting on top.
Begin with your first top fabric piece placed right side up on the batting. Place the second piece right side down along one edge of the first, aligning edges. Sew along that edge using a quarter-inch seam allowance, stitching through all layers.
After sewing, flip the second piece right side up and press it flat. This secures it to the batting and backing while adding your first quilting line. Continue adding fabric pieces in this manner, alternating directions until the entire surface is covered.
Once your top is complete, it’s time to add the applique. Trace your chosen shape onto the paper side of fusible web, cut it out, and fuse it to the wrong side of your applique fabric. Cut along the traced lines, peel off the paper, and position the applique on your mug rug.
Fuse the applique in place according to the fusible web instructions, then stitch around the edges with a zigzag, blanket stitch, or straight stitch. This not only secures the design but also adds decorative detail.
Finally, trim your mug rug to the desired size, square up the edges, and bind it using your preferred binding method. Hand-stitch or machine-stitch the binding for a polished finish.
Adding Personal Touches and Creative Variations
One of the best things about this Quilt As You Go Mug Rug Tutorial (with applique) is how customizable it is. Once you’ve mastered the basic steps, you can experiment with different designs and embellishments to make each mug rug unique.
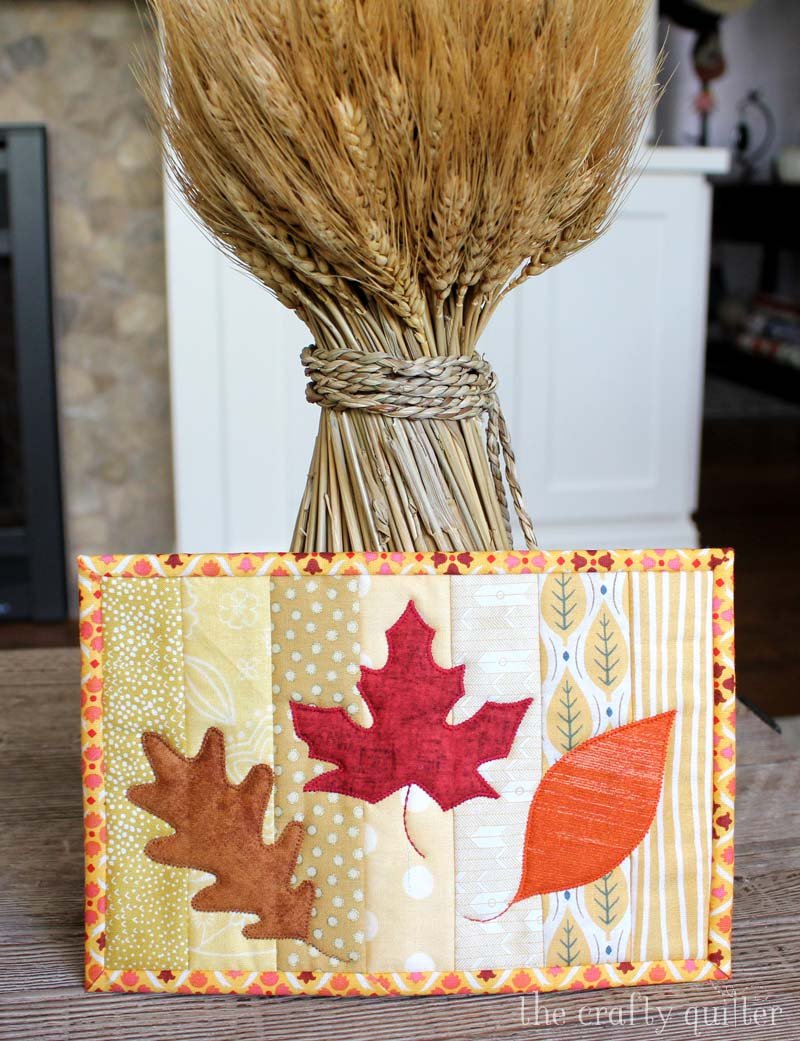
Try incorporating themed fabrics for holidays—reds and greens for Christmas, pastels for Easter, or warm tones for autumn. Matching your mug rug to a season or event makes it a thoughtful handmade gift.
You can also play with different applique shapes beyond simple hearts or flowers. Consider seasonal motifs, initials, or even small animals for a whimsical touch. Layering multiple applique shapes can add depth and interest.
Adding decorative quilting lines around your applique can create a frame effect, making your design stand out even more. Free-motion quilting is an option for those who want to practice more advanced techniques on a small scale.
Another variation is to use curved piecing instead of straight strips in the quilt-as-you-go method. While it takes a little more practice, the results can be striking and modern.
Lastly, consider finishing your mug rug with rounded corners instead of squared edges. This small change can soften the look and add an extra touch of charm to your finished piece.
Quilt As You Go Mug Rug Tutorial (with applique)
1. What size should a mug rug be?
A typical mug rug measures between 4×6 inches and 6×9 inches, but you can adjust the size depending on your preference and intended use.
2. Can I wash my mug rug?
Yes, you can wash a mug rug made with cotton fabrics and batting. Use a gentle cycle and mild detergent, then air-dry or tumble dry on low heat.
3. Do I need a special sewing machine for this project?
No, any standard home sewing machine can handle this Quilt As You Go Mug Rug Tutorial (with applique). Just make sure you use a sharp needle suitable for quilting.
4. What is the best applique stitch for beginners?
A simple zigzag stitch or blanket stitch works well for securing applique. These stitches are forgiving and provide a clean edge.
5. Can I skip the applique?
Absolutely! The applique is optional. You can create a beautiful mug rug using only the quilt-as-you-go method if you prefer a simpler design.
6. How long does it take to make one mug rug?
Most people can complete this project in 1–2 hours, depending on their sewing speed and the complexity of the applique design.
Creating a Quilt As You Go Mug Rug Tutorial (with applique) is a rewarding way to learn quilting techniques while producing something practical and beautiful. You’ve explored how to choose materials, assemble the quilt-as-you-go layers, add applique, and customize your design. Whether you make one for yourself or as a gift, each mug rug will carry your personal touch. I’d love to hear your honest opinion about this tutorial and any suggestions you might have for future projects.