
A crochet granny square baby blanket is one of the most charming and beginner-friendly projects in the world of handmade crafts. Its classic, nostalgic design brings warmth, love, and a touch of vintage charm to nurseries and baby showers. Whether you are making one for your own child, as a heartfelt gift, or even as a product to sell, this project is always a delightful choice.
The granny square technique is not only visually appealing but also incredibly versatile. With a variety of color combinations, sizes, and textures, you can personalize each blanket to suit any style or theme. The modular structure of granny squares makes it easy to build the project gradually, allowing crocheters to work at their own pace while enjoying the process.
In this article, you’ll learn how to start, design, and finish a beautiful crochet granny square baby blanket, even if you’re a complete beginner. We’ll explore everything from choosing the right yarn and hook to understanding patterns and joining your squares. Let’s dive into the cozy and colorful world of granny square baby blankets.
Choosing the Right Materials
To create a beautiful and functional crochet granny square baby blanket, it’s essential to start with the right materials. Babies have sensitive skin, so selecting soft, hypoallergenic yarn should be your top priority. Cotton and acrylic blends are popular choices because they are gentle, machine-washable, and durable.
Start with a lightweight yarn labeled as “baby yarn” or “DK weight.” These are designed specifically for infant projects and offer the right balance of softness and breathability. Stick to pastel colors or soft tones that are visually soothing, unless you’re going for a bold modern twist.
Your crochet hook size will depend on your yarn choice. Most baby blankets use a 4.0mm (G) to 5.5mm (I) hook. Check the label of your yarn for guidance. Using the correct hook ensures your stitches are neat and the finished blanket has the desired drape and feel.
You’ll also need a yarn needle for weaving in ends and scissors to trim your yarn. Stitch markers can help keep your squares even and symmetrical, especially if you’re new to the craft.
Remember that the quality of your materials directly impacts the longevity of the blanket. Always choose reputable yarn brands and wash your yarn beforehand if you’re concerned about allergies or chemicals.
Once you have your materials ready, you’re set to begin your first square. Keep your tools organized in a pouch or basket so you can work comfortably anywhere.
Investing a little time in gathering the right supplies will set you up for a rewarding and enjoyable crochet journey.
Understanding the Granny Square Technique
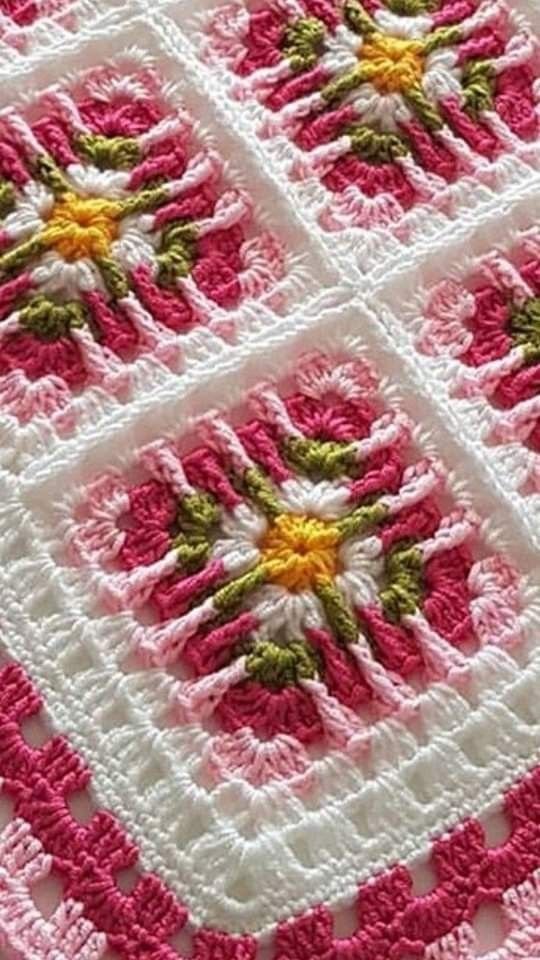
The heart of a crochet granny square baby blanket is, of course, the granny square. This timeless motif typically begins with a small loop in the center and expands outward in rounds using double crochet stitches, chain spaces, and corners.
Start your first square with a magic circle, which is a neat way to begin without leaving a hole in the center. If you find that tricky, a simple chain-4 loop joined with a slip stitch also works well for beginners.
The basic granny square pattern involves creating clusters of three double crochet stitches with chain spaces in between, forming a square shape. With each round, you add more clusters and chains, causing the square to grow.
You can keep your squares all one color or switch colors each round for a more vibrant, playful design. Changing yarn colors is easy and adds personality to your granny square baby blanket.
After you’ve mastered one square, you can replicate the pattern to make several identical or varied squares. Typically, a baby blanket requires between 25 and 49 squares depending on size.
If you prefer a more modern look, consider using solid granny squares, which eliminate the chain spaces between clusters for a tighter design. These are especially useful in colder climates or for added warmth.
The beauty of granny squares lies in their adaptability. With endless ways to mix and match colors and patterns, each blanket becomes a unique, heartfelt creation.
Assembling the Blanket
Once you’ve completed your collection of granny squares, it’s time to join them into a complete crochet granny square baby blanket. There are several joining techniques to consider, each offering a different texture and aesthetic.
One of the most popular methods is the join-as-you-go technique. This approach allows you to attach new squares to the blanket while working on the final round, saving time and avoiding large assembly sessions.
Alternatively, you can lay out all your completed squares in a grid and use a whip stitch or slip stitch seam to connect them. This method is ideal if you want to plan your color layout carefully before joining.
Be mindful of how you align your squares. Keeping the stitches and corners consistent ensures a professional and polished look. Take a few moments to block your squares if they’ve curled or vary slightly in size.
If you want a more decorative finish, try the flat braid join, which uses chains and slip stitches to create a lacy border between squares. This adds elegance and breathability to your blanket.
Don’t forget to weave in all your yarn ends neatly with a yarn needle. This step is crucial not just for looks but also for the longevity and safety of the blanket, especially since it’s intended for a baby.
Once joined, your blanket will truly start to come to life. It’s incredibly satisfying to see individual squares become a cohesive, cozy whole.
Finishing Touches and Border Options
No crochet granny square baby blanket is complete without a lovely border to tie the entire piece together. A well-chosen border adds a professional touch and helps stabilize the blanket’s edges.
Start with a simple single crochet border to smooth out any uneven edges and prepare for more intricate border styles. This foundational row also keeps the squares from stretching over time.
A shell stitch border is a classic and popular choice. It’s decorative, slightly ruffled, and adds a soft, delicate frame that’s perfect for a baby’s blanket. Use a contrasting color to make the edge pop.
Another option is the picot edge, which gives a subtle yet charming finish. Picot stitches are small loops that add texture without being overwhelming.
If you prefer a minimalist look, stick with one or two rows of single or half double crochet stitches. These create a clean edge that highlights the blanket’s colors and stitch work.
Don’t forget to wash and block your finished blanket. Blocking ensures the squares and edges lie flat, giving your project a polished look. Use a gentle detergent and dry the blanket flat to preserve its shape.
Adding a tag or a little ribbon bow can personalize your gift or product. It’s a sweet final touch that reflects the care and thought you’ve put into your granny square baby blanket.
Crochet Granny Square Baby Blanket
How many granny squares do I need for a baby blanket?
A typical baby blanket made with granny squares uses between 25 and 49 squares. The exact number depends on the size of each square and the desired blanket dimensions.
What size should a granny square baby blanket be?
A common size for a baby blanket is around 30 x 36 inches (76 x 91 cm), but this can vary based on personal preference or purpose (crib, stroller, etc.).
What is the best yarn for a baby blanket?
Soft, hypoallergenic yarns such as cotton, bamboo, or acrylic blends are ideal. Look for yarns labeled “baby yarn” to ensure they are safe and gentle for infants.
Can I wash a granny square baby blanket in the machine?
Yes, if you use machine-washable yarn. Always check the yarn label for washing instructions and consider using a gentle cycle with cold water to protect the stitches.
Is this project suitable for beginners?
Absolutely. Granny squares are one of the easiest crochet motifs and are perfect for beginners looking to build confidence while creating something beautiful.
How do I join granny squares together?
You can use methods like whip stitch, slip stitch seam, or join-as-you-go. Each technique offers a different finish and level of flexibility depending on your skill and design goals.
How long does it take to make a granny square baby blanket?
Time varies by skill level and square size, but a beginner can typically complete the project in 1 to 2 weeks with regular progress.
Can I sell granny square baby blankets?
Yes, many crafters sell handmade baby blankets online or at local markets. Be sure to use safe materials and clearly list washing instructions for buyers.
Creating a crochet granny square baby blanket is more than just a crafting project — it’s an expression of care, creativity, and tradition. From selecting the softest yarns to joining colorful squares and finishing with a decorative border, every step is filled with intention and joy.
We’ve covered everything you need to get started: choosing the right materials, mastering the granny square technique, assembling the blanket, and finishing with a professional touch. With time, patience, and a little practice, your handmade blanket will become a cherished keepsake.
If you enjoyed this guide or have tried making your own granny square baby blanket, feel free to leave a sincere opinion below. Your feedback and suggestions help us grow and support others in their crochet journey.