
Crochet square for beginners is one of the most popular starting points for anyone venturing into the world of crochet. These small, manageable projects offer the perfect opportunity to learn essential stitches, practice consistency, and create something beautiful right from the start. Whether you’re aiming to make a simple coaster, a vibrant blanket, or a decorative pillow cover, mastering the crochet square is your gateway into the world of creative fiber art.
Starting with a crochet square for beginners allows you to build confidence while working on small, repetitive tasks. You can experiment with different colors, yarn textures, and hook sizes without feeling overwhelmed. Plus, these squares are incredibly versatile—they can be joined together to create large projects or stand alone as lovely accents.
This guide will walk you through everything you need to know about crochet square for beginners, including materials, basic stitches, techniques, and troubleshooting tips. With just a little practice, you’ll soon be creating beautiful handmade squares that reflect your style and creativity.
Choosing the Right Tools and Materials
Before diving into your first crochet square for beginners, it’s important to gather the right tools. Selecting the appropriate materials ensures a more enjoyable experience and better results.
Start with a medium-weight yarn, often labeled as worsted weight or category 4. This yarn is thick enough to hold shape but easy enough to handle, especially for beginners. Acrylic yarns are affordable and widely available, making them a great starting point for practice squares.
Pair your yarn with a matching hook size. Usually, a 5mm (H-8) crochet hook works well with worsted weight yarn. Check the yarn label for recommendations. The right hook size prevents your stitches from becoming too tight or too loose.
You’ll also need scissors and a yarn needle. Scissors are used to cut your yarn when you’re done, and the yarn needle helps you weave in the ends neatly. Keeping your tools organized in a small project bag is also helpful.
Stitch markers can be incredibly useful, especially when working on your first few squares. They help you identify the beginning and end of rounds or rows and ensure consistency in stitch counts.
Lastly, having a printed or digital pattern nearby can be helpful for guidance. While this guide will provide a simple pattern, many beginners benefit from visual aids or step-by-step instructions.
Learning the Basic Crochet Stitches
Understanding basic stitches is essential when working on a crochet square for beginners. Most beginner squares are made up of just a few foundational stitches.
The chain stitch (ch) is usually the first you’ll learn. It forms the base of almost every crochet project. To create it, make a slipknot on your hook and yarn over, pulling through the loop. Repeat this process to build a foundation chain.
Next is the single crochet (sc), a compact stitch that creates a tight, firm fabric. Insert your hook into a chain or stitch, yarn over, pull up a loop, yarn over again, and pull through both loops on the hook.
Double crochet (dc) is another fundamental stitch, taller than single crochet and great for adding texture. Yarn over first, then insert the hook into the stitch, yarn over and pull up a loop, yarn over again and pull through two loops, yarn over once more and pull through the last two loops.
The slip stitch (sl st) is used to join rounds or move across stitches without adding height. Simply insert your hook into the stitch, yarn over, and pull through both the stitch and the loop on your hook.
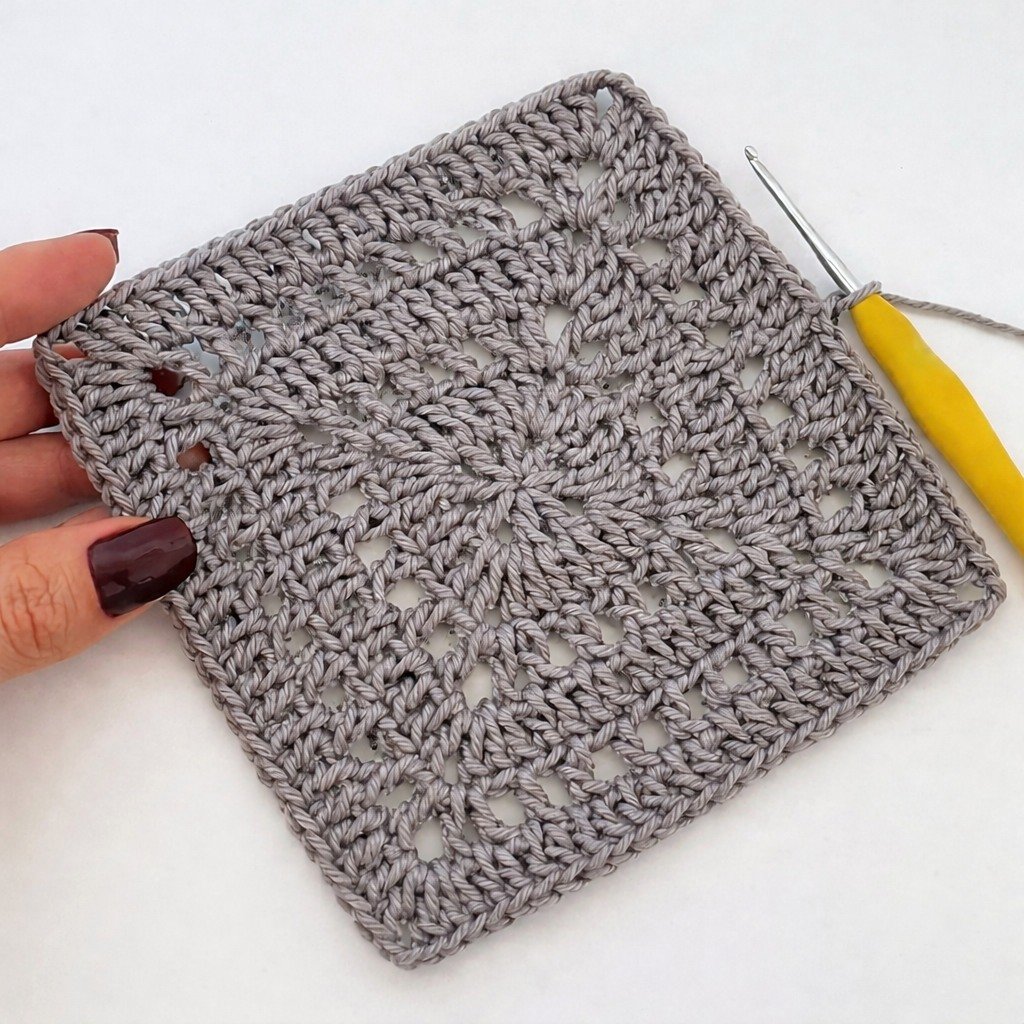
Granny squares, the most classic crochet square for beginners, often use a combination of chains and double crochet stitches. Once you feel confident with these, you can start building your own square patterns.
Practice these stitches repeatedly on scrap yarn before committing to a full square. Repetition will help you memorize hand movements and develop an even tension.
Step-by-Step Guide to Making Your First Square
Creating a crochet square for beginners doesn’t have to be complicated. Here’s a simple pattern to get you started with a basic granny square.
Begin with a slip knot and chain four stitches. Join with a slip stitch into the first chain to form a ring. This ring is the center of your square.
Round 1: Chain 3 (counts as your first double crochet), then double crochet two more times into the ring. Chain 2. Repeat the pattern (3 dc, ch 2) three more times. You should have four sets of three double crochets, separated by chain-2 spaces. Join with a slip stitch into the top of the beginning chain 3.
Round 2: Slip stitch into the next two stitches to reach the corner space. Chain 3, 2 dc, ch 2, 3 dc into the corner. Chain 1, then repeat (3 dc, ch 2, 3 dc) into each corner with chain-1 spaces in between. Join with a slip stitch.
As you build more rounds, each corner will continue to follow the same pattern: (3 dc, ch 2, 3 dc), and each side will have groups of 3 dc separated by chain-1 spaces.
Finish your square when it reaches your desired size. Fasten off by cutting the yarn and pulling the tail through the last loop. Use your yarn needle to weave in all ends securely.
Don’t worry if your square isn’t perfect. Practice will improve your tension and technique over time. Blocking your square can also help even out the shape.
This basic pattern is adaptable. Try switching colors on each round or using different yarn textures to add variety to your practice.
Common Mistakes and How to Fix Them
Even with a crochet square for beginners, it’s normal to make a few mistakes. The good news is that most errors are easily fixable with some patience and attention.
One of the most common issues is an uneven square. This often happens when stitch tension varies. To fix it, make sure you’re not pulling the yarn too tightly or too loosely as you work.
Another issue is forgetting or miscounting stitches, especially in corners. Always double-check that you’re placing six double crochets in each corner space (3 dc, ch 2, 3 dc) and that the sides have the correct number of stitches.
If your square is curling or waving, it could be due to too many or too few stitches. Lay your square flat often to ensure it’s maintaining its shape. Adjust stitch counts accordingly in your next attempt.
Gaps between stitches can be frustrating. This usually happens with loose tension or large hooks. Switching to a slightly smaller hook or tightening your yarn hold can solve the problem.
Joining new yarn or changing colors can also cause untidy spots. Always join yarn at the end of a round and weave in ends discreetly to keep your square looking clean.
Finally, don’t be afraid to unravel and redo a round if needed. Crocheting is as much about learning as it is about crafting. Every mistake helps you grow as a creator.
Creative Ways to Use Your Crochet Squares
Once you’ve mastered the crochet square for beginners, you might be wondering what to do with all the squares you’ve made. The possibilities are endless!
One of the most popular uses is to assemble multiple squares into a blanket. You can arrange them in a pattern or go for a random color mix for a modern look.
Crochet squares also make excellent coasters or pot holders. Use cotton yarn for heat resistance and durability. These make lovely handmade gifts as well.
If you’re feeling adventurous, try sewing squares together to make a cushion cover. A front panel of four or six squares sewn onto a backing fabric makes for a charming home décor piece.
You can also turn squares into tote bags. Join four to eight squares into a rectangular panel, add handles, and line it with fabric for sturdiness.
Bookmarks are another creative option. Use thinner yarn and a smaller hook to make delicate squares, then add a tassel for flair.
For holiday décor, consider using squares to make bunting or tree ornaments. Just add a hanging loop and maybe a bit of embellishment for a festive touch.
Frequently Asked Questions
What is the easiest square to crochet for beginners?
The easiest square is the classic granny square. It uses basic stitches like chain and double crochet and works in the round, making it ideal for beginners.
How many stitches do I need to start a crochet square?
Most patterns begin with a chain of 4–6 stitches joined into a ring or a chain foundation of around 20 stitches for a row-based square. It depends on the pattern style.
Why is my crochet square not lying flat?
Your tension may be too tight or too loose. Also, incorrect stitch counts in corners can cause warping. Blocking the finished square can help fix this.
Can I use any yarn for a crochet square?
Yes, but beginners should start with medium-weight (worsted) yarn. Avoid fuzzy or textured yarns at first, as they can make it hard to see your stitches.
How do I join crochet squares together?
You can sew them using a yarn needle or join them with crochet methods like slip stitch or single crochet. Each method creates a different look.
Should I block my crochet squares?
Blocking helps even out the shape and size of your squares, especially if they will be joined together. It’s recommended, particularly for acrylic and natural fibers.
Learning how to make a crochet square for beginners is one of the most rewarding steps in your crochet journey. With the right tools, a bit of practice, and an open mind for creativity, you can turn simple squares into beautiful and functional pieces. From mastering basic stitches to fixing common errors and exploring creative uses, this guide aimed to give you everything you need to get started.
If this article helped you, feel free to leave a sincere opinion or suggestion below. Your feedback helps improve the content and supports other beginners on their crochet adventure!