
If you’re looking for a fun, beginner-friendly quilting project, this Easy Pinwheels Quilt Block Tutorial is exactly what you need. Whether you’re brand new to quilting or simply want to master a classic pattern, pinwheels are a wonderful place to start. These charming blocks add movement, symmetry, and visual interest to any quilt design, making them a favorite among quilters of all experience levels.
The Easy Pinwheels Quilt Block Tutorial walks you through step-by-step instructions, from fabric selection to the final stitch. It’s a relaxing and satisfying project, and once you learn the technique, you’ll be able to use it for everything from baby quilts to table runners and wall hangings. Best of all, it’s simple enough that you can complete a few blocks in just one sitting.
This article covers everything you need to create perfect pinwheel blocks, including fabric tips, cutting and piecing instructions, pressing advice, and layout inspiration. By the end, you’ll feel confident in your ability to create beautiful, balanced pinwheel designs every time. So, let’s dive right into this Easy Pinwheels Quilt Block Tutorial and start stitching!
Choosing the Right Fabrics for Pinwheel Blocks
Picking the right fabrics is the first step in any quilting project. For this Easy Pinwheels Quilt Block Tutorial, you’ll want to select two contrasting fabrics to make the pinwheel shape pop. High contrast between colors—such as light vs. dark or warm vs. cool tones—helps define the block’s design clearly.
Cotton fabric is the best choice for beginners. It’s easy to work with, doesn’t stretch much, and is widely available. Look for quilting cotton in complementary colors or choose themed prints for special projects like holiday quilts or baby blankets.
Think about the overall mood of your quilt when choosing colors. Soft pastels create a calming, vintage vibe, while bold primary colors make for a fun and energetic look. Whatever your aesthetic, make sure the fabrics coordinate well together to avoid visual noise in the final design.
Pre-washing your fabric can help prevent shrinking and bleeding. This step is especially important when you’re using high-contrast fabrics, as it helps maintain the crisp lines of your pinwheel design over time. Just remember to iron your fabric after washing to remove any wrinkles that may affect your cutting.
You’ll need two squares of fabric for each pinwheel block. For this tutorial, we recommend starting with 5″ x 5″ squares, which will result in a finished 4″ pinwheel block. You can scale up or down depending on your quilt’s size, but starting small gives you a chance to perfect your technique.
Choosing the right fabric isn’t just about looks—it also makes your sewing process easier. Stiff fabrics that don’t fray easily are ideal for beginners, as they hold shape well when cut and sewn. Keep this in mind when shopping or choosing from your fabric stash.
How to Cut and Piece Your Pinwheel Blocks
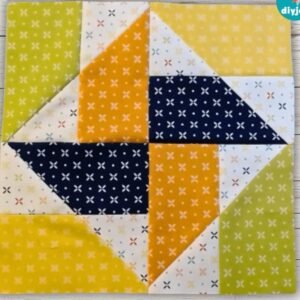
With your fabrics chosen, it’s time to start cutting. For this Easy Pinwheels Quilt Block Tutorial, accuracy is key. Begin by stacking your two squares, right sides together. Using a rotary cutter and ruler, cut the squares diagonally in both directions to create four triangles from each square.
Now you should have eight triangles—four of each fabric. Pair each triangle from one fabric with a triangle from the other fabric, aligning the straight edges. Sew them together along the long diagonal, using a ¼” seam allowance. This will form four two-tone squares, which are called half-square triangles (HSTs).
Press each seam open or to one side, depending on your preference. Open seams help reduce bulk in the center of the block, which is especially helpful in pinwheel designs where several seams meet. Use a warm iron and take your time with this step—accurate pressing can make a big difference.
Once your HSTs are pressed, trim them to ensure all squares are the same size. This improves accuracy when assembling your pinwheel block. Use a square ruler and cutting mat to trim off any excess edges, aiming for a perfect square shape.
Lay out your four HSTs in a square formation, alternating the fabric positions so they form a spinning pinwheel shape in the center. It may take a moment to get the layout just right, so take your time. Once you’re satisfied, begin sewing the HSTs together—first into two rows, and then join those rows to complete the block.
Don’t forget to press your seams after sewing each row. Try to alternate the direction you press each row so the seams nest neatly when joined. This reduces bulk and helps align the corners perfectly, giving your Easy Pinwheels Quilt Block a clean and professional finish.
Tips for Perfecting Your Pinwheel Quilt Blocks
Even though this is an Easy Pinwheels Quilt Block Tutorial, precision and patience are still important. One common issue quilters face is having mismatched points in the center of the block. The trick is to make sure all your HSTs are the same size and sewn with consistent seam allowances.
Use a scant ¼” seam allowance when sewing your triangles and rows. This gives you a little extra room for trimming and alignment without compromising the block’s final size. Many sewing machines have a quilting foot that helps maintain the correct seam allowance.
Chain piecing is a great time-saving technique when making multiple blocks. Instead of sewing and trimming each block individually, sew all your triangles into HSTs at once, then press and trim them all before assembling the pinwheels. This improves efficiency and ensures uniformity.
Don’t rush the pressing process. Use a pressing cloth if your fabric is delicate, and press—don’t iron—the seams. Ironing can stretch the fabric and distort the shapes, while pressing keeps everything aligned. You can even use starch spray for added crispness.
Using pins can also help improve accuracy. Pin your rows together before sewing to make sure all corners and points align. Some quilters prefer clips, but pins tend to provide better precision, especially when dealing with small or intricate blocks like pinwheels.
If your points still don’t match perfectly, don’t stress. Quilting is a creative process, and small imperfections add character. Over time, your skills will improve. The key is to keep practicing and enjoy the process of learning and making something beautiful with your hands.
Creative Ways to Use Pinwheel Quilt Blocks
Once you’ve mastered this Easy Pinwheels Quilt Block Tutorial, the design possibilities are endless. You can use individual blocks to make coasters or potholders, or combine several to create full quilts, wall hangings, or baby blankets. The classic pinwheel design is versatile and timeless.
Try alternating your pinwheel blocks with plain squares for a clean, modern layout. This helps each pinwheel stand out and gives your quilt some breathing space. It also reduces the number of blocks you need to sew, which is a nice bonus for larger projects.
For a more dynamic look, play with color placement. Use a single background fabric and switch up the pinwheel color in each block, or create a gradient effect by using colors from the same family. This adds movement and interest to the final quilt.
Consider combining pinwheel blocks with other classic block patterns. They pair well with four-patch or flying geese blocks for more complex designs. This adds variety to your quilt without overwhelming the pinwheel motif.
Don’t be afraid to scale your blocks up or down depending on your project. Larger blocks are great for throw quilts and are faster to sew, while smaller blocks add detail to mini quilts or accessories. Once you’re comfortable, feel free to experiment.
You can even make a scrappy version using leftover fabric from other projects. Mixing prints and colors gives the quilt a cozy, homespun feel. Just be sure to maintain some contrast between the fabrics so the pinwheel shape remains visible.
Easy Pinwheels Quilt Block Tutorial
Q: What size squares should I start with for pinwheel blocks?
A: For beginners, 5″ x 5″ squares are ideal. They’re easy to work with and produce a finished block around 4″ in size. You can adjust depending on your desired final block size.
Q: Do I need special tools to make pinwheel blocks?
A: No special tools are required, but a rotary cutter, cutting mat, and quilting ruler will make the process more accurate and enjoyable.
Q: How do I make sure my points meet in the center?
A: Accuracy in cutting and consistent ¼” seam allowances are key. Also, pressing seams open or nesting them helps align the points perfectly.
Q: Can I use charm packs for pinwheel blocks?
A: Absolutely! Charm packs are perfect because they come pre-cut in 5″ squares, which is the recommended size for this Easy Pinwheels Quilt Block Tutorial.
Q: Are pinwheel blocks suitable for beginners?
A: Yes, they’re a great introduction to basic quilting techniques like cutting, piecing, and pressing. Plus, they’re fun and fast to sew.
Q: How many pinwheel blocks do I need for a full quilt?
A: That depends on your quilt size and block dimensions. For a baby quilt, 25 blocks might be enough, while a queen-size quilt could require 100 or more.
In this Easy Pinwheels Quilt Block Tutorial, we explored every step of creating one of the most beloved patterns in quilting. From choosing fabrics to piecing, pressing, and layout ideas, you’ve learned how to bring your pinwheel blocks to life with confidence and creativity.
Remember that quilting is as much about the journey as the final result. Don’t worry if your first blocks aren’t perfect—the more you practice, the better they’ll get. Enjoy the rhythm of sewing, the beauty of fabrics, and the satisfaction of creating something handmade.
We’d love to hear your thoughts! If you tried this tutorial or have your own tips for making pinwheel blocks, please leave a sincere opinion and any suggestions you might have. Your feedback helps improve the community and inspire more quilters like you!
Let me know if you’d like this article as a downloadable PDF or adapted to Portuguese!