
If you love mini crochet projects and quirky accessories, the Crochet Coke Bottle Keychain is a perfect DIY idea to add to your crafting list. Right from the first stitch, this creative design combines nostalgic charm with practical use. Whether you’re looking to personalize your keys or create a unique gift for a soda lover, this project brings together creativity and simplicity in one delightful piece.
The Crochet Coke Bottle Keychain has gained popularity for being both fun to make and easy to carry around. It’s a beginner-friendly project that doesn’t require a lot of yarn or time. Plus, it allows crafters to express their personality while showing off their handmade skills. With just a few basic materials and stitches, you can crochet a miniature version of a classic Coke bottle that will wow anyone who sees it.
In this tutorial, we’ll go over everything you need to make your own Crochet Coke Bottle Keychain, from materials to techniques. Whether you’re a seasoned crocheter or just starting out, this project is a wonderful way to practice shaping, color changes, and small detailing. Not only will you create a cute and functional accessory, but you’ll also develop skills that can be applied to many other amigurumi-style creations.
1. Materials and Tools You’ll Need for Your Crochet Coke Bottle Keychain
Before you get started with your Crochet Coke Bottle Keychain, gather all the necessary materials. Having everything ready will make the process more enjoyable and stress-free.
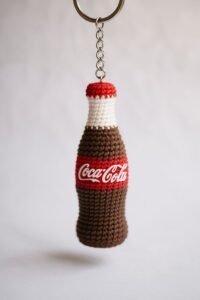
You’ll need some worsted weight yarn in a few different colors: brown for the bottle, white for the label, red for the classic Coke branding, and a bit of gray for the bottle cap. Small amounts will suffice since it’s a mini project.
A 2.5 mm or 3.0 mm crochet hook works best for this kind of amigurumi, helping you get tight stitches that hold the stuffing well. Be sure to choose a size that matches your yarn to avoid gaps.
You’ll also need a tapestry needle for sewing in ends and attaching parts, and a small amount of polyester fiberfill stuffing to give your bottle shape and volume.
Don’t forget a keychain ring or lobster clasp. This will turn your mini Coke bottle into a functional accessory that can be attached to keys, bags, or zippers.
Stitch markers are helpful for keeping track of your rounds, especially if you’re working in continuous spirals. They ensure your shape stays symmetrical and neat.
Finally, a pair of sharp scissors will be needed to trim yarn ends. It’s always good to keep your tools organized in a small pouch or basket as you work.
2. Step-by-Step Crochet Instructions for the Bottle Base
To begin the Crochet Coke Bottle Keychain, we start with the base of the bottle, which is crocheted in the round using a simple amigurumi technique.
Create a magic ring with brown yarn and work 6 single crochets into the ring. Pull it tight to close and begin increasing in each stitch around.
Continue working in spirals, increasing evenly to shape the round bottom of the bottle. After a few rounds, stop increasing to build up the height.
Once the base is wide enough, switch to straight single crochets to build the cylindrical body of the bottle. This is where you determine how tall you want the bottle to be.
Stuff the bottle base lightly as you go. You want it firm enough to hold its shape but not overly stuffed, which might stretch the stitches.
Use your stitch marker to keep track of each round. Adjust the height to your liking but remember this is a mini project, so about 2.5 to 3 inches tall is ideal.
Once you’ve reached the desired height, you can decrease slightly to begin tapering toward the neck of the bottle before switching yarn colors for the label area.
3. Adding the Label, Cap, and Final Touches
After completing the bottle body, it’s time to add the label, cap, and finish off your Crochet Coke Bottle Keychain with some fine details.
Switch to white yarn to create the middle stripe of the bottle where the label goes. Crochet a round or two with white to simulate the label area.
Then, switch to red yarn to add a touch of that iconic Coke branding. You can either embroider a tiny “C” or “Coke” using a needle and red yarn, or crochet a small red band.
After finishing the label, continue tapering the top of the bottle with brown yarn to simulate the neck. Use some decreases to create the narrowing effect.
Next, change to gray yarn to crochet the bottle cap. A couple of rounds with tight stitches will do the trick. You can also surface stitch lines to mimic the ridges of a cap.
Once all the crocheting is done, secure your ends with the tapestry needle. Make sure everything is tightly fastened to ensure durability when used as a keychain.
Finally, use a jump ring or lobster clasp to attach the bottle to the keyring. Insert it through the top of the bottle cap or add a small chain if you want it to dangle freely.
4. Tips for Customizing Your Crochet Coke Bottle Keychain
What makes the Crochet Coke Bottle Keychain even more special is that it can be personalized in endless ways to reflect your style or brand.
You can swap colors to mimic different soda bottles like orange, lemon-lime, or even your own fictional flavors. It’s a creative way to play with color theory in crochet.
If you enjoy embroidery, you can add initials, symbols, or even tiny heart motifs to your bottle label for a cute, handmade twist.
Consider using glitter yarn for the label or bottle cap if you want to give your keychain a more whimsical or festive look.
Another idea is to make a set of soda bottle keychains in a variety of “flavors” and gift them as a fun collection. They make great stocking stuffers or party favors.
You can also turn them into bag charms or even zipper pulls for backpacks, jackets, or pouches. Their small size makes them incredibly versatile.
For those who sell handmade items, offering custom versions of the Crochet Coke Bottle Keychain can attract buyers looking for personalized gifts.
FAQ – Frequently Asked Questions About the Crochet Coke Bottle Keychain
Q: How long does it take to make a Crochet Coke Bottle Keychain?
A: On average, it takes about 1 to 2 hours to complete, depending on your crochet skill level and pace.
Q: Is this a good project for beginners?
A: Yes, the Crochet Coke Bottle Keychain is beginner-friendly, especially for those looking to try out amigurumi for the first time.
Q: What yarn is best for this project?
A: Worsted weight acrylic yarn works well for its durability and availability. Cotton can also be used for a firmer finish.
Q: Can I wash the keychain if it gets dirty?
A: Yes, but hand-washing is recommended. Let it air dry completely to maintain its shape and stitching.
Q: What size should the finished Coke bottle be?
A: Most finished keychains are about 2.5 to 3 inches tall, making them compact and easy to carry.
Q: Can I sell the Crochet Coke Bottle Keychains I make?
A: Absolutely! As long as you’ve created the pattern yourself or used one with selling rights, it’s a great item to add to your craft stall or online shop.
The Crochet Coke Bottle Keychain is more than just a mini project—it’s a delightful way to mix nostalgia with creativity. It’s a fun, beginner-friendly item that adds a playful touch to everyday accessories. Through this tutorial, you’ve learned how to crochet the base, shape the bottle, add label details, and attach the keychain ring. You’ve also seen how easy it is to customize the design to make it truly your own.
Whether you’re crafting for yourself or making gifts for others, this project is sure to bring smiles. If you’ve tried this pattern or plan to, feel free to leave your honest opinion and suggestions. Your feedback helps make this community of makers even better!