
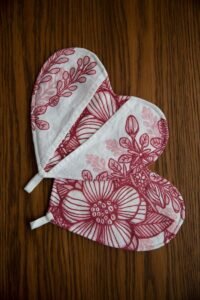
DIY Heart-Shaped Potholders are a delightful blend of creativity and functionality, perfect for adding a personalized touch to your kitchen or gifting something handmade and heartwarming to loved ones. Right from the first stitch, these adorable potholders bring joy, whether you’re an experienced sewist or just starting your crafting journey. Shaped like hearts and designed for everyday use, they are a fun way to experiment with fabrics, patterns, and your imagination.
Creating your own DIY Heart-Shaped Potholders is not just a practical project—it’s also a therapeutic and rewarding hobby. Sewing something with your hands offers a calming escape from screens and daily stress, while the final result adds a meaningful item to your home. These potholders are not only decorative but also heat-resistant when made with proper materials, serving as a safe accessory while cooking or baking.
In this comprehensive tutorial, you’ll learn everything you need to know to make your own DIY Heart-Shaped Potholders from start to finish. We’ll go over the materials needed, step-by-step instructions, customization options, and tips for gifting or selling your handmade pieces. Let’s dive into the joy of sewing these lovely kitchen companions.
1. Gathering Materials for Your DIY Heart-Shaped Potholders
Before beginning your project, it’s essential to gather all the necessary materials to ensure a smooth crafting experience. Being prepared helps avoid interruptions and allows for a more enjoyable workflow.
You’ll need high-quality 100% cotton fabric, preferably in contrasting colors or prints. Cotton is ideal because it’s durable and handles heat better than synthetic fabrics. Look for charming patterns—florals, gingham, polka dots—that align with your kitchen décor or the season.
You’ll also need cotton batting or insulated batting like Insul-Bright. This inner layer provides the heat resistance needed to safely use your potholders when handling hot pots and pans. If you plan to use the potholders frequently, insulated batting is highly recommended.
Don’t forget matching thread, fabric scissors or rotary cutter, pins or clips, and a heart-shaped template. You can draw the shape yourself or trace it from an object or printed image. Aim for a size that comfortably fits your hand.
A sewing machine makes the process quicker and neater, though these potholders can also be sewn by hand with patience. If you’re adding embellishments like lace, ribbon, or decorative topstitching, collect those items as well.
Keep a steam iron on hand to press your fabric, which ensures accuracy and a polished finish. A fabric marking tool or chalk pencil will help outline your template and guide your stitching.
Now that your tools and materials are ready, it’s time to bring your DIY Heart-Shaped Potholders to life with careful construction and a dash of creativity.
2. Step-by-Step Sewing Instructions
Making DIY Heart-Shaped Potholders involves several simple steps that even beginners can follow. With a bit of patience, you’ll have beautiful results in no time.
Start by tracing your heart-shaped template onto the wrong side of your fabric and batting layers. You’ll need two pieces of fabric (front and back) and one or two layers of batting, depending on how thick and heat-resistant you want the potholder to be.
Cut out all layers neatly using sharp scissors or a rotary cutter. Make sure all layers are aligned before continuing to the next step. A clean cut ensures easier sewing and a more symmetrical final product.
Stack the layers in the following order: batting on the bottom, one fabric piece right side up, and the other fabric piece right side down. This sandwich method ensures the seams will be inside once turned.
Pin the layers together, leaving a small opening (around 2 inches) on one of the straight edges for turning the potholder right side out. Sew around the heart shape with a 1/4-inch seam allowance, backstitching at the beginning and end.
After sewing, trim excess fabric around the curves and clip the inner points of the heart to reduce bulk. Carefully turn the potholder right side out through the opening and gently push out the edges using a blunt tool like a chopstick.
Press the potholder with an iron to flatten it nicely. Then topstitch around the entire edge, which will close the turning hole and give a crisp finish. At this stage, your DIY Heart-Shaped Potholders are fully functional and beautifully handmade.
3. Customization and Decorative Ideas
One of the most enjoyable parts of making DIY Heart-Shaped Potholders is personalizing them. These little kitchen accessories are a blank canvas for your imagination.
Experiment with different color schemes and patterns. Use bold reds and pinks for Valentine’s Day, or soft pastels for spring-themed gifts. Holiday-themed fabrics also work wonderfully for festive kitchen décor.
Add embroidery or appliqué to the front of your potholder for a touch of personalization. A monogrammed initial, a small flower motif, or a cute kitchen-themed design can make the potholder extra special.
You can also sew in a loop or ribbon at the top of the heart for hanging the potholder on a hook or handle. It’s both decorative and functional, keeping your kitchen organized and charming.
Consider using lace trim or piping around the edge for a vintage feel. These additions elevate the look and show off your sewing skills. Be sure to add these elements before sewing the front and back pieces together.
Another fun variation is using patchwork or quilted techniques. Combine scraps of different fabrics for a truly unique look. Quilting the potholder adds texture and makes it more durable.
Finally, you can create a reversible design by using two different fabrics for the front and back. This gives your DIY Heart-Shaped Potholders dual personalities and makes them even more versatile.
4. Gifting, Selling, and Caring for Your Potholders
DIY Heart-Shaped Potholders make lovely gifts for birthdays, holidays, housewarmings, and weddings. They’re thoughtful, practical, and show that you took the time to create something by hand.
To present them as gifts, consider tying them with a ribbon, placing them in a cute box, or pairing them with a matching tea towel or apron. A handwritten note adds a personal touch that recipients truly appreciate.
If you’re looking to sell your potholders, they’re perfect for craft fairs, Etsy shops, or local markets. Be sure to describe them as handmade, insulated, and washable. Beautiful photos with styled backgrounds can help your product stand out online.
To care for DIY Heart-Shaped Potholders, always wash them in cold water on a gentle cycle, especially if they include embellishments. Air-drying is best to maintain shape and fabric quality.
Avoid exposing them to direct flames or extremely high temperatures, even with insulated batting. They’re heat-resistant but not fireproof. Encourage safe use in all labels or care instructions.
Over time, potholders may show signs of wear. Luckily, making new ones is easy and fun. Keep scraps from other projects to make your next batch more eco-friendly and cost-effective.
These potholders are a great way to express creativity while being useful and appreciated in daily life. Their heart shape adds a playful twist that makes even the most routine kitchen task feel special.
FAQ – Frequently Asked Questions About DIY Heart-Shaped Potholders
Q1: What size should a heart-shaped potholder be?
A: A good size for usability is around 7 to 9 inches wide. It should be big enough to protect your hand but not too bulky to store or handle easily.
Q2: Can I use polyester fabric or batting?
A: It’s best to stick with 100% cotton fabric and insulated cotton batting. Polyester can melt under high heat and poses a safety risk when used near hot cookware.
Q3: How can I make my potholder more heat-resistant?
A: Use Insul-Bright or layered cotton batting for better heat protection. Some crafters use two layers of batting to increase insulation.
Q4: Is it okay to hand sew the potholder if I don’t have a machine?
A: Yes! While a machine makes things faster, you can definitely sew your DIY Heart-Shaped Potholders by hand with a strong backstitch and patience.
Q5: Can I wash these potholders in the machine?
A: Absolutely. Machine wash in cold water on a gentle cycle and air dry to maintain their shape and durability.
Q6: What’s a good beginner tip for making these potholders?
A: Start with simple fabric choices and fewer embellishments. Practice sewing smooth curves, and don’t skip the pressing steps—they make a big difference.
Making your own DIY Heart-Shaped Potholders is a heartwarming and practical craft that brings creativity into your kitchen. From choosing the perfect fabric to adding your own special touches, this project is rewarding in every way. You’ve learned how to gather the right materials, sew step-by-step, customize your design, and even care for or gift your potholders. Whether you’re crafting for yourself or sharing them with others, each potholder is stitched with love and intention.
I’d love to hear your thoughts on this tutorial! Was it helpful? Did you try making your own DIY Heart-Shaped Potholders? Share your feedback and suggestions below—your input helps make this crafting community even better.