
If you love crafting and enjoy adding a touch of charm to your daily essentials, Making Sunbonnet SUE Key Holder is a delightful way to combine creativity and functionality. From the nostalgic appeal of the beloved Sunbonnet Sue figure to the practicality of a handmade key holder, this project offers a perfect blend of tradition and usefulness. Whether you’re a beginner in sewing or an experienced crafter, this tutorial will guide you through every step of the process.
Making Sunbonnet SUE Key Holder is not just a DIY project; it’s a celebration of handcrafting history. Sunbonnet Sue has been a treasured motif in quilting and sewing communities for generations. Known for her charming silhouette, often in a bonnet and dress, Sue has adorned quilts, appliqués, and even embroidery. Now, she makes a charming transition into a key holder — a small yet meaningful accessory you can proudly display or gift to a loved one.
In this article, you’ll learn how to create a functional and visually appealing Sunbonnet Sue key holder using simple materials and straightforward techniques. You’ll also discover how to customize your design, explore color choices, and master the fine details that bring the character to life. Get ready to bring a piece of classic crafting into your modern lifestyle with this cheerful and creative project.
1. Gathering Materials for Making Sunbonnet SUE Key Holder
To begin Making Sunbonnet SUE Key Holder, you’ll first need to collect a few essential materials. Fortunately, this project is scrap-friendly, so you can make use of fabric remnants and sewing leftovers.
Start by choosing your fabric pieces. Cotton fabric works beautifully for this project, especially if it comes in floral or pastel prints to mimic the vintage aesthetic of Sunbonnet Sue. Choose contrasting fabrics for the bonnet, dress, and background for a vibrant finish.
You’ll also need interfacing or felt to give your key holder structure and support. This helps the final piece stay firm when in use. Additionally, select threads that match or contrast your fabric, depending on your design preference.
Other materials include scissors, sewing needles or a sewing machine, fabric glue, a small key ring, and optional embellishments such as buttons, embroidery floss, or ribbons. A fabric marker can be helpful to trace the design onto your material.
Once your materials are ready, organize them on a clean work surface. This allows for an efficient and enjoyable crafting experience. If this is your first time making this type of project, take your time to get comfortable with the tools before jumping into sewing.
Now that you have everything at hand, you’re ready to move to the design phase. Personalizing your Sunbonnet SUE Key Holder makes the craft more meaningful and engaging, and it’s where your creativity truly shines.
2. Designing and Cutting Your Sunbonnet SUE Key Holder
The joy of Making Sunbonnet SUE Key Holder lies in the thoughtful details of the design. Before you begin stitching, spend some time planning out how you want your key holder to look.
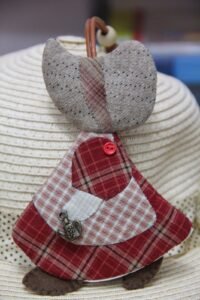
Sketch or print a simple Sunbonnet Sue silhouette. This can be your template for tracing onto fabric. Remember that Sunbonnet Sue is recognized by her large hat, puffed sleeves, and classic dress. Make sure the silhouette reflects these elements.
Cut out your fabric according to your template. You’ll need separate pieces for the bonnet, dress, and shoes. If desired, you can add extra elements such as an apron or holding a flower. This adds character and whimsy to your design.
Lay out your fabric pieces on the background fabric to check the arrangement. Adjust spacing and layering until you’re satisfied. Glue or pin them in place temporarily to avoid shifting while sewing.
When cutting the fabric, precision is key. Take your time to follow the traced lines and keep your scissors sharp to avoid fraying edges. Consider using pinking shears for decorative cuts or to reduce fray.
If you plan to include embroidery, such as facial details or decorative outlines, mark the positions lightly with a fabric pencil. This is especially charming if you want to give your Sue a custom personality.
This stage is where your Sunbonnet SUE Key Holder starts coming to life. The character begins to emerge with every piece you prepare, turning this into a truly heartwarming handmade item.
3. Sewing and Assembling Your Key Holder
Once your pieces are cut and arranged, it’s time to sew your Sunbonnet SUE Key Holder. This step combines the functional aspect of stitching with the decorative joy of hand or machine sewing.
Begin by attaching the fabric pieces onto the background using either a straight stitch, blanket stitch, or zigzag stitch. This secures the edges while adding a decorative outline. Take your time with curves and corners for a clean finish.
If you’re hand-sewing, a small backstitch can provide strength and control. Use embroidery floss or contrasting thread for added visual interest. You can even add texture by incorporating French knots or lazy daisy stitches in the bonnet or dress.
Reinforce the backing fabric with interfacing or a felt layer. This ensures the key holder stays sturdy over time. If you’re planning to use it regularly, don’t skip this step—it significantly improves durability.
Once Sue is fully appliquéd, it’s time to sew or glue a small loop of ribbon or fabric to the top of the piece. Attach the key ring through this loop. You can also sew a key ring directly into the top seam if you prefer a more integrated design.
Trim any excess threads, check for loose stitches, and press the piece gently with an iron to smooth everything. At this point, you might want to add final embellishments such as buttons, lace trim, or small bows.
Your Sunbonnet SUE Key Holder is almost complete! All the love and detail you’ve added in these steps will shine through in the final product, creating a truly unique and functional craft piece.
4. Personalizing and Gifting Your Sunbonnet SUE Key Holder
One of the most enjoyable aspects of Making Sunbonnet SUE Key Holder is the ability to personalize each creation. You can tailor each key holder to suit your own taste or the preferences of the person you plan to gift it to.
Change up the colors and patterns of the fabric to create seasonal versions. Try autumn tones for a fall-themed piece or soft pastels for spring. Holidays like Christmas or Easter also offer great inspiration.
For a more rustic or vintage look, opt for faded floral prints, lace, and wooden buttons. For modern or bold designs, use bright solids or geometric patterns. The versatility is endless, allowing you to match any style.
You can even personalize the face of Sunbonnet Sue by adding tiny stitched eyes or rosy cheeks with fabric markers. These little touches make each key holder feel more alive and full of personality.
These handmade key holders make wonderful gifts for friends, teachers, or family members. They’re great for holidays, birthdays, or as small thank-you gestures. Add a hand-written tag or place it in a small box for an extra special touch.
Another idea is to create sets of matching accessories using the same fabrics—perhaps a coin purse, a mini tote, or even a matching quilt block. This turns a simple gift into a coordinated keepsake collection.
The act of Making Sunbonnet SUE Key Holder becomes even more meaningful when it’s shared. Whether given as a gift or made in a sewing group, the joy of crafting multiplies through connection and creativity.
FAQ: Making Sunbonnet SUE Key Holder
What is the origin of Sunbonnet Sue?
Sunbonnet Sue is a classic quilt appliqué pattern dating back to the late 1800s. She became especially popular in the 1930s during the Great Depression, representing innocence, femininity, and timeless style.
Can I make a Sunbonnet Sue key holder without a sewing machine?
Yes! This project can be entirely hand-sewn using simple stitches. It’s perfect for beginners or those who prefer slow, mindful stitching.
What size should the Sunbonnet Sue key holder be?
The ideal size is around 3 to 4 inches tall, but you can adjust the template to fit your preferences. Just ensure it’s not too bulky for practical use.
What type of fabric is best for this project?
Cotton quilting fabric is ideal due to its softness, stability, and variety of prints. Felt can also be used for a no-fray, easy-to-sew option.
Can children help with this craft?
Yes! With adult supervision, children can assist in tracing, cutting fabric, or even stitching. It’s a lovely way to introduce them to sewing.
How do I care for the finished key holder?
Spot clean with a damp cloth and avoid soaking or machine washing. If it gets dirty, gently dab the surface with mild soap and water.
Creating a Sunbonnet SUE Key Holder is more than just a sewing activity—it’s a heartwarming journey into heritage, creativity, and personal expression. Through the steps of gathering materials, designing, sewing, and adding personal touches, you not only craft a practical item but also breathe new life into a timeless character beloved by generations.
Whether you keep it for yourself or gift it to someone special, this charming key holder is sure to spark smiles and start conversations. We hope this tutorial inspired you to try it and make it your own.
We’d love to hear from you! Share your thoughts, your creative twists, or suggestions for other handmade keepsakes. What was your favorite part of Making Sunbonnet SUE Key Holder? Leave a sincere comment below and help build a community of joyful crafters!